Preflighting: boring but important
Know more about preflighting than your software or you’ll get caught out.
Grammar purists, look away now; this is all about a word that’s made its way from composite adverb to standalone verb. Preflighting is the act of going through a series of important checks before committing yourself. It originated in the flight industry (hence the name, obviously) where it refers to the rather important process of checking through vital points before taking off. Flaps? Check. Rudder? Check. Fuel? Check. Wings? Check… Okay, real preflight checklists are far more serious than that – and also even more boring. And that’s part of the point; they’re formal lists of things that would be too easy to skip or forget otherwise.
Preflighting in the design and publishing production industry isn’t quite the same life-or-death stuff, but it can make the difference between something going smoothly through the prepress process or turning into an expensive, deadline-busting disaster. The production preflight process is unarguably boring, but it is just as unarguably important. It can spot the fiddly little slipups that turn a job into a costly nightmare.
The good news is that doing this yourself, by hand, is not necessary. That’s great, because anything that’s boring and repetitive risks being left undone. Admit it, we’re all the same. Your desktop publishing software will have basic preflight features built in, so you can check for problems from the same place you (possibly) created them in the first place. This is as it should be; it is the job of software to take care of tedious, repetitive jobs for you.
Adobe appeared to reduce the importance of the preflighting process back in InDesign CS4 by pulling the Preflight term from the File menu. The Package command is still there, and it still does some basic preflight operations and reporting before actually packaging anything. But preflighting hasn’t been spurned; far from it, although you’d be forgiven for thinking otherwise.
InDesign CS4 brought us the Preflight panel – used by some, ignored by most. This was done to give us as-you-go preflight features, catching errors and glitches as they occur – rather than at the end of a long production workflow, when you can be bothered to check and if you remember. This is a good idea and a very worthy ambition… if only it matched up with reality! What actually happens is pretty much the same as always: people design things, then maybe check near the end to see if any problems have cropped up. If you have any experience in publishing – any kind at all – this will be a familiar story. Yes, making sure things work well early on is good. But in many established workflows it can be a litte disruptive having to stop to fix things as you go rather than all at once later on.

One of the strengths – and, as happens so often also one of the weaknesses – of InDesign’s dynamic preflighting feature is that it is based on predefined profiles. Set these up just so, and you end up with the equivalent of a smart expert watching out for slipups as you work. The trouble is, like all clever stuff of this nature, you’re assumed to know both the why and the how of this stuff; why you should customise profiles and how to do it.
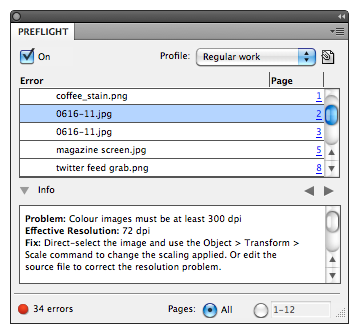
The good side of this is that it can help at least to basic levels without any customising. The warnings shown with the default profile cover missing image links, overset text and missing fonts, classic slipups that cause print production errors. The bad side is that there are other common mistakes that aren’t enabled by default: low image resolution is possibly the most common error of them all, but that’s not included in the default ‘Basic’ profile.
The solution is to create a customised profile that includes the things you worry about. Yep, I’m recommending buying into the whole dynamic preflight routine. Face it, it is better than what we had before, or at least it can be once you make a profile that’s better than the default.
- Open InDesign’s Preflight panel (Window > Output > Preflight) and see what’s shown in the Profile popup menu. Unless you’ve been here before it will be the one called “[Basic]”.
- Pick Define Profiles from the panel’s popup menu and create a new profile.
- Give this the same options as the default one, and add the minimum resolution options for colour, greyscale and 1-bit monochrome images. These should be at 300, 300 and 900 respectively, not the oddly lower 250 and 800ppi these are to start with. Non-proportional scaling of placed objects is also worth considering; that should help deal with stretch-to-fit graphic laziness. Other options to consider depending on your print output methods are minimum stroke width (hairline 0.125pt is often risky), non-proportional type scaling (you don’t expect me to allow type distortion, do you?), minimum type size – but limited to multiple inks or white. The latter will help avoid the disappearing white-on-black text problem that happens with small text.
Once you’ve saved your profile you can switch between this and the default in the Preflight panel and see where your errors crop up. You can also work with this panel closed, as the traffic light icon and error count field are shown in the bottom of your document window as well.
But stop for a moment and think about the consequences of using all these settings. One not-so-great result is error fatigue, or ‘cry wolf’ syndrome, where the sheer number of errors and their apparent (and often actual) triviality leads people to ignore the warnings altogether. They are also likely to assume that there are no other issues beyond what’s reported, which is definitely risky.
One recent example I saw was a document with 54 warnings shown in the small bar at the bottom of the layout document – and this was after fixing the various broken links to images that had been moved around in the Finder. The errors were all down to two things: images in RGB rather than CMYK mode, and overset text. In this case the output was to be PDF using the Press Quality preset, so all colour would be converted to CMYK in the output, using the custom specified FOGRA27 destination. Leaving images in RGB mode means not taking direct charge of the conversion process, but the end result was exactly the same. This is known as an RGB workflow, and despite the warnings preflight software likes to give there’s nothing inherently wrong with it. In fact it’s a more flexible and more modern style of working, and it work well… as long as you make sure the final conversion – wherever in the production process that might be – is appropriate. As for the overset text, this was caused by stray return characters spilling out of the end of a couple of dozen or so text boxes. No visible content was lost, but the extra returns were too much for the boxes to hold.
Was this a problem? Well, yes and no. There was no ‘missing’ text; no sentence was lost or cut off half-way through. But because this was flagged as a problem and the designer knew it wasn’t, it was completely ignored. And that really is a problem, because there could have been an actual case of cropped-off text somewhere in the layout.
As it happens there were real problems in the layout, but not anything that the regular preflight process had picked up. Solid black blocks had been placed behind white banner-style text – which is fine. But some of the blocks were filled with InDesign’s default plain black, a single-colour hit of ink that looks a bit thin in large areas, one with a custom rich black, and the rest were filled with an RGB black, which is converted to CMYK in the PDF using the current Creative Suite settings. Expect an over-rich four-colour black from those. This came to light when checking the PDF in Acrobat; fortunately it renders on-screen simulations of the CMYK ink behaviours, so the mix of grey-black and black-black boxes gave it away. Would this problem be possible to pick up in an automated preflight process? It isn’t in the list of options in the Preflight Profiles setup dialog, so no, it isn’t.
InDesign’s automatic preflight feature is certainly better than what we had before, but it is a far cry from comprehensive. The bottom line is that there’s just no substitute for intelligent workflows and careful preflight checking by hand – with the software there to relieve the more boring aspects, of course.