With resolution, size does matter
 When I teach I constantly have to remind myself that things that seem simple because I learned them years ago weren’t always easy to grasp the first time around. Image resolution is a bit case in point; understanding the relationship between a bitmap image’s resolution, pixel dimensions and printed size is simple once you know – but it can seem algebraically opaque when you don’t.
Start with the basics: a bitmap image is simply a big grid of pixels, like a sheet of graph paper with different squares filled in. How fine that grid is – how big the individual squares are – is what determines how sharp and detailed the image can be. If the grid is coarse then the pixels are large and there’s no clarity, just blockiness. If the grid is fine – higher resolution, fitting more pixels into a linear inch – you can show crisp details. The down side is that higher resolution images produce larger files, so the trick is making things good enough to show the detail you need – but no more than that.
How much image detail – what resolution – is enough? You’ve probably heard the term ‘300ppi’ being bandied about. This rule of thumb says that an image’s resolution should be 300 pixels per inch, or ppi. No, not dpi, that’s something different. (Okay, now everyone who knows me is grinning. As a technical editor I am generally expected to get a little obsessed with technical accuracy, and the ppi/dpi thing is one of my pet peeves.)
Actually, the original thumb rule here is that an image’s resolution should be at least two times the halftone screen ruling value – which, if you’ll humour me for a moment, is measured in lines per inch, or lpi. (This is ‘lines per inch’ because of the way halftones were traditionally made, by exposing continuous-tone images through a screen made of opaque lines to produce the final dots.) For reasonable quality offset litho print, the halftone screen is generally 133lpi or 150lpi – so the simple, safe thing to ask for is two times 150lpi, or 300ppi.
When image setters create the final print artwork output the laser’s dot size might be 2000dpi or more. Or if you’re using inkjet technology the device will typically put your designs on the page at an ink-dot size of 720 or 1440dpi. Don’t let this distract you from the 300ppi rule of thumb.
By the way, the terminology thing is very simple: bitmap images are made of pixels, halftones are based on lines, printers make dots on paper; ppi, lpi and dpi respectively, and not interchangeably. So don’t let me catch you talking about dpi for images again, not even if your scanner software does the same thing!
Anyway, back to figuring out what resolution an image should be. The trick is to remember that the ‘per-inch’ resolution of a graphic relates to the size it’ll be used in the final design, nothing else. Put dauntingly, it is a mathematical function of the pixel dimensions of an image divided by the size it is to be used. This just means that if you need to fill a four-inch-high space your image will need to be 1200 pixels tall; four times 300ppi. Scan and crop accordingly.
|
60 pixels square. Scaled up, it is obviously soft and lacking detail. |
 |
120 pixels square. Scaled up, it is better than before – but still poor. |
 |
239 pixels square |
| The same image in three different resolutions. Scaled to a size appropriate to the pixels, they all look good. But scale an image so the pixel grid is enlarged too much and it becomes obviously sub-par. | |
The complication comes when you need to print a picture larger or smaller than your original; scaling needs to be taken into account. Enlarging an image in the page layout reduces the output resolution – it enlarges the size of the pixel grid as it appears in the final product – so you’ll need to start with a higher resolution image in the first place. Stretch an image to twice the original size on the page and you’ve enlarged that pixel grid. Similarly, if the original image is twice the size you need, scaling it down to 50% on the page will double the ‘effective’ resolution: a 300ppi image becomes a 600ppi one.
“So what,” I hear you ask, “it doesn’t matter as long as it isn’t lower than 300ppi, right?” That’s okay if you’re making PDFs; massively oversized images (larger than 450ppi) are automatically resampled to more appropriate sizes. But this still means you’re mucking about with larger files than you need. This will have an impact on storage and file transfer, which is just poor resource management.
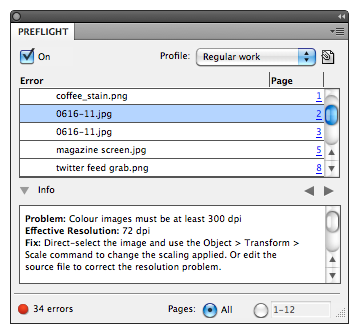
If you’re using relatively up to date DTP software it is easy to tell what output resolution an image is at. InDesign users can look in the Info panel. When a bitmap image is selected you’ll see a bit of detail there – the crucial bit being the ‘effective resolution’. Make sure that’s somewhere around the 300ppi mark and you’re good. If you see two different numbers in the Effective ppi line you’ve distorted the image; avoid this. QuarkXPress shows an image’s resolution in the Measurement palette, that all-important floating window that shows the key data and controls for whatever is selected. (InDesign calls this ppi but QuarkXPress falls into the dpi trap. Yes, I’ve told Quark. Yes, I’m obsessed.) By the way, if images look low-res in your layouts no matter what you do this is probably just them being shown crudely to save time. See View > Display Performance in InDesign or View > Full Res Previews in QuarkXPress.


Figure out (a) how big the image needs to be in the end, (b) how big the original is, (c) what you need to do to get something at roughly the right final pixel size – and then start scanning.
When scanning, you may be offered all sorts of resolutions by the scanning software. Before you go crazy, make sure you know what your scanner’s optical scanning resolution is. This is going to be lower than the quoted maximum, but that’s just interpolated – faked – up from the real optical limit. Stick to the optical maximum as your highest level; going above won’t actually get you any better detail.
Another scanning tip: if you’d like to wring the very best that you can from your scanner don’t scan at resolutions that aren’t clean divisions of the optical res. If it is a 600ppi scanner this means you should only scan at 600, 300, 150ppi and so on. You’ll get the cleanest, least fudged-around results this way. The difference will be subtle, but you should always aim to have the cleanest and most accurate scans possible.
Finally, check the scan preview and use your scanning software’s image enhancement features. Even a low-end scanner can do a better job if you take the time to adjust the black and white points first. This should give you images that are at least a little pre-optimised right from the start. Any levels or curves work you do afterwards in Photoshop will throw some image data away, so minimise that if you can.
If you’re working with images meant for use on screen, life is actually much more straightforward. Forget the confusion of halftones, effective resolution and all that; just aim for the actual number of pixels you need to fill. Got a 600 pixel-wide space to fill? Make your image 600 pixels wide and you’re done. The whole ‘per inch’ thing is about telling your layout software how to scale the image into a real-world print space, mapping the relative pixel grid to an absolute physical size. That’s not important for screen display, just work with actual pixel dimensions and judge things at 100% size in Photoshop.
One last thing – this whole 300ppi thing is simply a guide for normal photographic-style images. If you’re dealing with crisp line art the problem of pixellation will be much more obvious. The thumb-rule there is more like 1200ppi to keep edges looking sharp and smooth. And if you actually want a pixellated effect or you’re reproducing screengrabs, use whatever resolution you like. Scale something so the pixels are the size of your thumb if that suits your design. Your preflight software will complain that those things are ‘too low resolution to print’, but now that you know what this means you’ll know when you can ignore it.


One Comment