Pagination and page imposition is a strange thing when you first try and grok it. As designers we always see the pages in our layouts as sequentially numbered page pairs. The most complicated things normally get is explaining to newbies why things always start with a right-hand page (it’s the cover, of course), and figuring out how to start at a different page number when you’re splitting a publication up across multiple documents. (It’s easy, go to Layout > Numbering & Section Options.)
This is still all about ‘designer’s pairs’, looking at a multiple-page document from the point of view of the designer. But that’s not how things are printed. In order to fit sets of A4 pages onto the larger sheet run through a commercial press and have them assembled easily into the final sets of folded and trimmed pages, print production people use what’s called imposition: the rearrangement of pages into ‘printer’s pairs’, set up so that page two will end up facing page three despite being on different bits of paper in the finished book or magazine.
InDesign has a basic option for imposing pages and printing them out for collation into booklets. It’s called Print Booklet, cunningly enough, and it offers a few useful tricks for the occasional small project. It’s good for exploring the basics of imposition, but use it much and you’ll find its limitations. Most critically, it won’t save what it does to PDF, so you have to be connected to the printer to use it. This means no preparing an imposed job for output later at your local high street copy-shop, for example. Admittedly, you’ll normally leave the intricacies of imposition to whoever prints your final product, but working out imposition logic can be handy when doing your own thing – not to mention designing a foldable poster or similar dual-purpose product.
To do this start by folding a sheet of paper in half. This makes it a folio, with two ‘leaves’ and four pages. Now take this folio and fold it up once more to get four leaves – eight pages. At this point it’s no longer a folio, it’s a quarto, but ignore that for now. You can’t flip through these as regular book-style pages, obviously, as the folds start getting in the way, but note how the page order works: jot down the page number on each page, making sure to be clear which way up the 1 is, then unfold the quarto back to a single open sheet. The part for page one is at the top-right, paired with page eight. Below are pages four and five, upside down. On the reverse – well, you can see how it behaves. Printers will have page imposition schemes that show how to split up and rearrange your designer’s pair spreads into printer’s pairs that come together logically when everything’s folded, trimmed and collated. However, because we’re making a one-sheet publication that works like a booklet when folded but opens up to be more like a poster we’ll be doing the imposition process ourselves.
For each small ‘page’ to appear the right way up and in the right running order we’ll have to spin and juggle different parts of the design into a pre-imposed full-sized page layout. It’s fiddly, but there’s a trick to it that sorts out most of the fuss once everything’s been worked out and tested on paper.
To begin with, find out what’s the largest size of paper you can get printed. If you plan to use an office printer or a high street copy-shop it’s probably A3, or the slightly larger SRA3 at best. Folding this twice gives you A5 as your end size. A typical litho printer will be able to work with up to B2, able to handle full A2 plus bleed and crop marks with comfort and allowing full A4 pages once it’s folded twice.
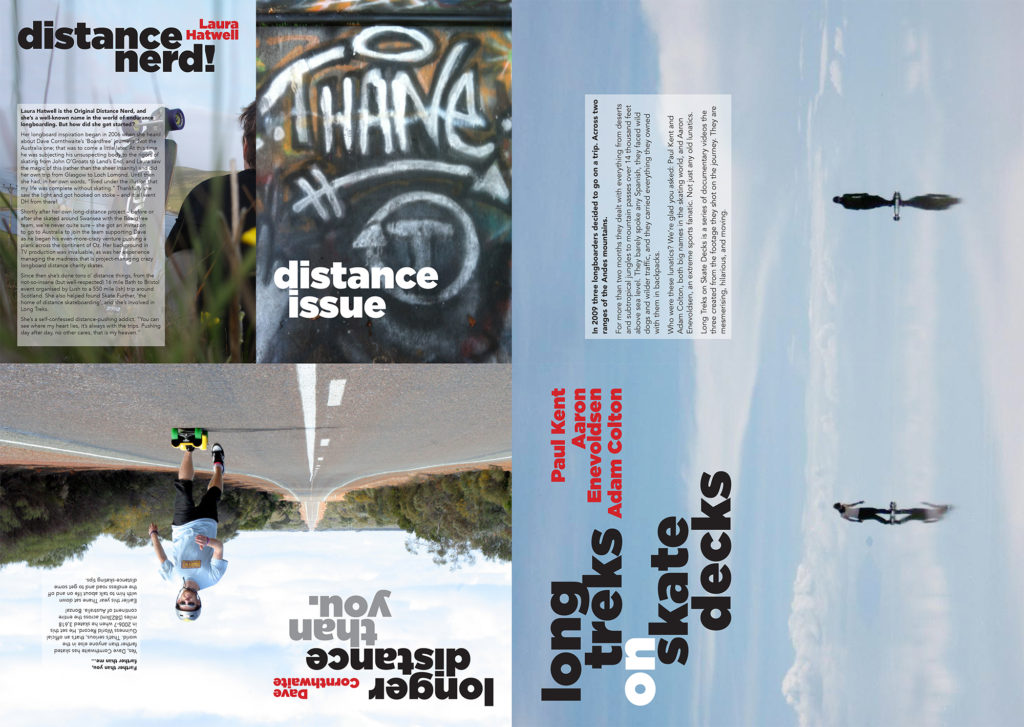
Next, grab a pencil and sheet of paper. A4 will do, it doesn’t have to be the full size. Fold it up as planned and sketch out how you want the pages to work. Remember to think about how people will interact with the product as they unfold it, revealing different grouped ‘page panels’ as they go. Sketch these out on your sheet, and keep folding and unfolding it to get a feel for the way different parts are revealed, how someone might turn it as they go, and how you can use these different sizes and orientations. If you go for three folds rather than two you get more variety, but your folded item gets smaller. Of course.
Then comes the layout process. You could go straight to a full-size A3 or A2 page, set up guides where the folds are to go, and design directly into that. But the different rotations make this a bit messy, so I prefer to design in a separate InDesign document set up with a page size matching the final folded dimensions. Keep consulting your folded paper plan as you design the pages, and remember which ones will end up rotated and under others. Don’t worry about rotating things here, that comes later. If you want to work on different sizes you can work across spreads or even add a new master page to the document and make that the required different dimension.
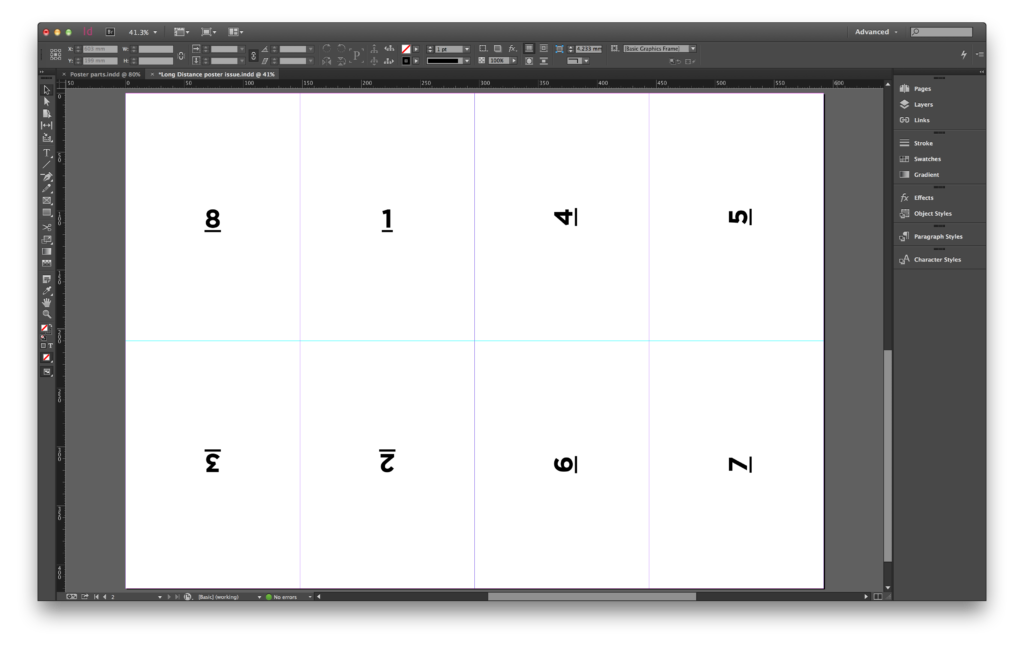
Finally comes the assembly process: make a new InDesign document for your full-size poster and set up guides for your horizontal and vertical fold lines, working from the page edge rather than the margins. Choose File > Place, make sure Show Import Options is checked, and select your new PDF.
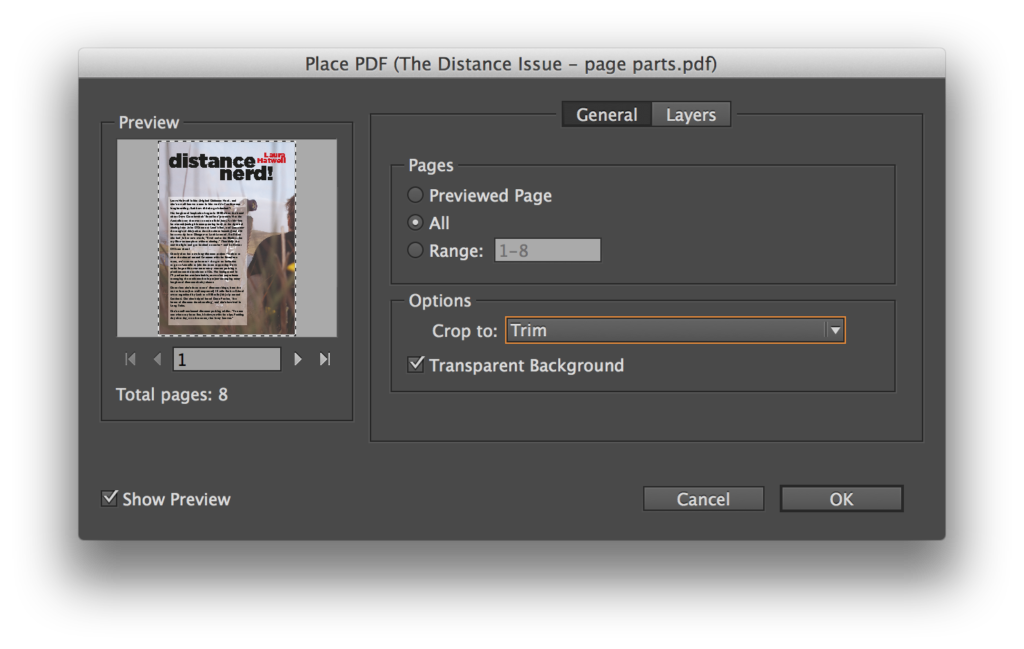
In the Place PDF dialog that now opens you must choose ‘All’ for the pages to place and crop to Trim (the intended trimmed page area). Click OK, then just keep clicking to place a fresh box for each imported page. Arrange in your imposition order, snapping things to the guides and rotating as required. All you need to do now is print a scaled version on your own printer to check it folds up and displays as intended. When you’re happy, export a new PDF of your fold-up page-imposed poster and send that somewhere to be printed at full size.
Finally, what about those funky names? They don’t refer to specific physical sizes, just the number of parts they produce from the original sheet. Folding a sheet once makes it a folio, and when that’s folded again it’s called a quarto – four leaves. There’s a clunky but logical consistency to the rest of the names; another fold produces eight leaves and the result is called octavo. This also applies to cutting as well as folding, which is fortunate otherwise it would run up against the whole ‘maximum number of folds in a sheet of paper’ thing. A fourth fold or cut produces sixteen pages from a sheet, and that’s ‘sixteenmo’. In theory this goes up to sixty-fourmo, for 128 pages from a single sheet of paper. Presumably a very large sheet, or the final page size would be minuscule. Of course, unless you’re working in the print production side of the book industry you’ll probably never come across these again.
| Traditional terms for what’s produced when dividing up a sheet of paper as part of (normally book-based) print production | ||
|---|---|---|
| Name | Leaves | Pages |
| Folio | 2 | 4 |
| Quarto | 4 | 8 |
| Octavo | 8 | 16 |
| Sixteenmo | 16 | 32 |
| Twenty-formo | 24 | 48 |
| Forty-eightmo | 48 | 96 |
| Sixty-formo | 64 | 128 |
