A form of standardised international illustrated instruction?
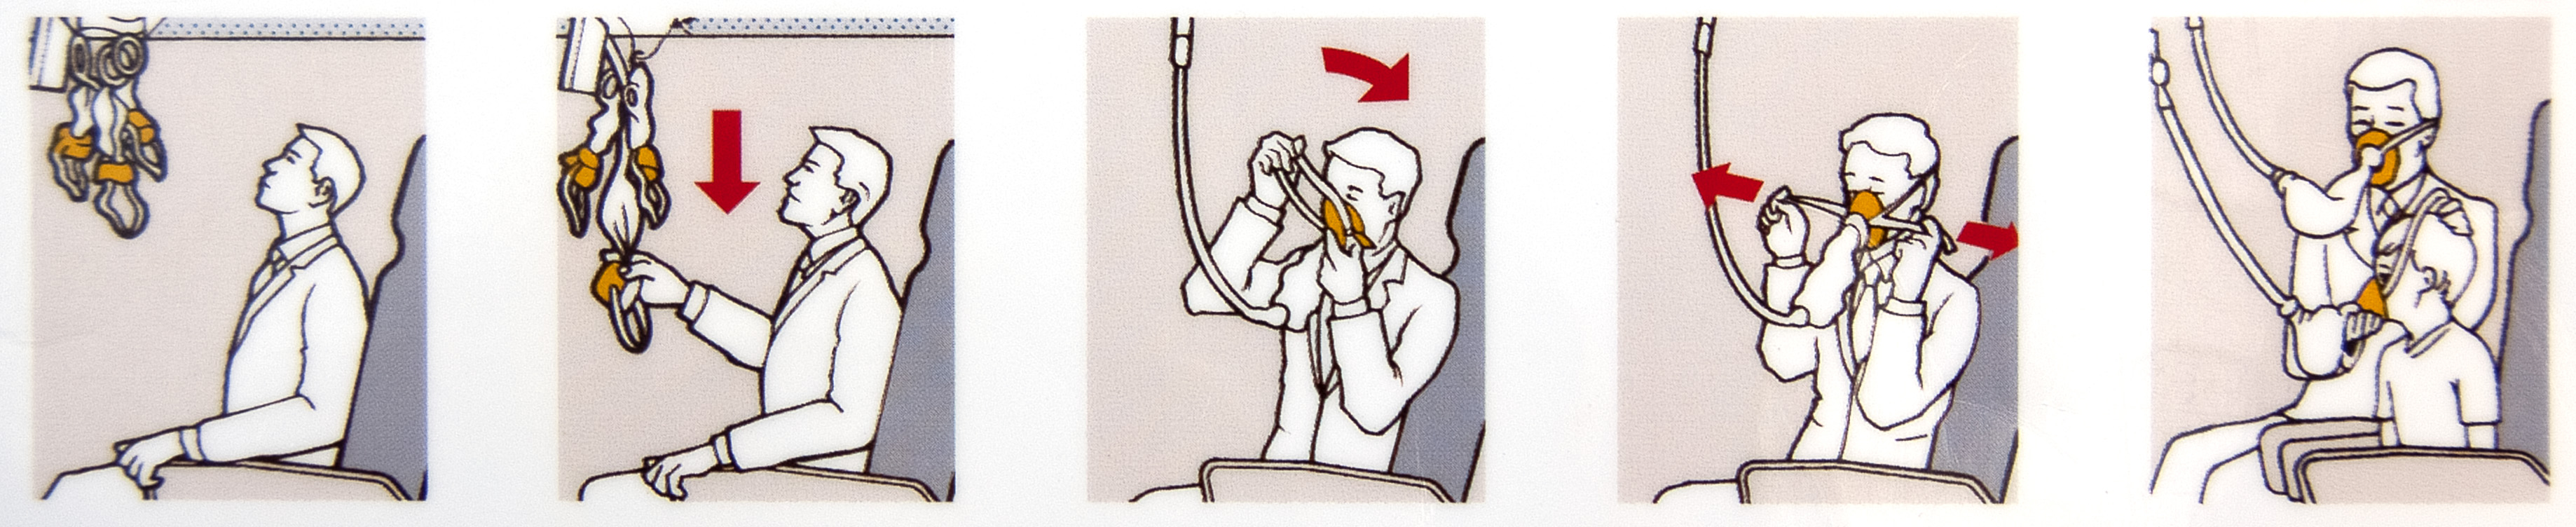
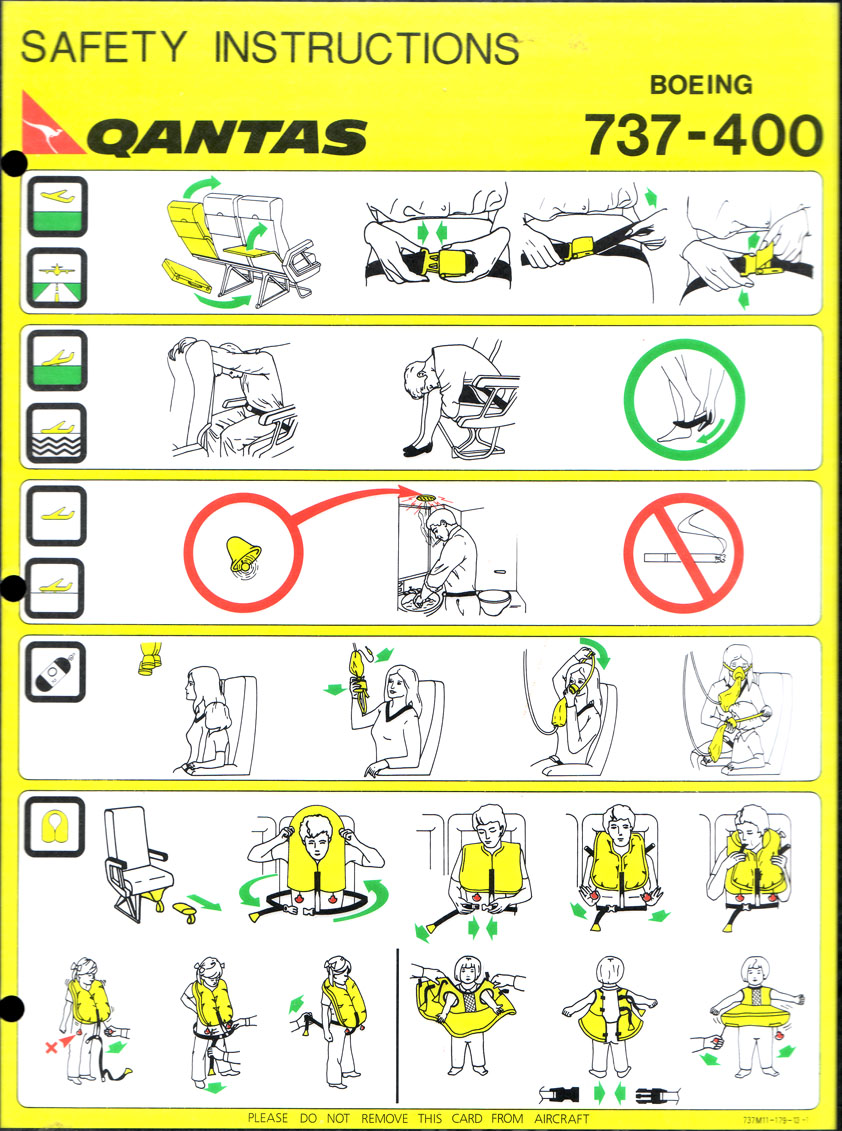
 On a recent trip to Turkey I realised something: there’s one thing that you’ll find on every commercial airline flight you’ll ever take. No, not dodgy food (some flights don’t serve any, which can be a hidden blessing), I mean those airline safety instruction cards that are tucked into every seatback pocket. These show graphically stylised line-art illustrations of people opening emergency exits, putting on oxygen masks, wearing inflatable life vests (never inflate in the cabin or you’ll look daft), and sliding down the emergency exit inflatable slide. I’ve always fancied doing that, but going through the required events to get to that point seems rather less fun.
These cards contain little or no words other than a title that lets you know which aircraft it is for. The graphics are supposed to be understandable no matter what language you speak, and despite the sometimes hilarious interpretations these can be given they do generally do the job pretty well.
 One curious thing about airline safety instructions is the number of people that think they’re not true, that the advice they give is really just to keep body parts together to give crash investigators an easy job or, most cynical of all, to keep death high and major survived injury low in order to keep a lid on insurance payments. This rumour is oddly pervasive; I’ve been told this myself by otherwise calm, sensible people. I suppose from the point of view of car crashes, where you don’t want to put your face up against something solid, the advice may seem strange. But airline seats aren’t the same as car seats, and the damaging ricochette effect of heads bouncing off things is minimised by staying in contact with the seat back in front of you. There are also numerous tests, studies, real-world crash examples and even a Mythbusters episode that debunk the stories (series 33 episode 9, June 22nd 2005 to be specific), so please don’t let anyone spread that myth any further.
Airline safety cards are apparently collectible items, although this seems potentially a bit risky as well as nerdy: they aren’t supposed to be removed from the aircraft and they can even be considered contraband if taken through customs in some countries. (No, I don’t know which countries these are, and I have no interest in finding out the hard way!) Still, there’s no shortage of these things on eBay: try searching for “airline safety card” and you’ll get a few hundred results at any one time. Feel free to bid on one or even two for graphic source material… but if you find yourself building up a collection be careful who you tell. Not because of the legality question, just because it is the mark of an obsessive.
A bit of Mac trivia for you: a large number of the safety cards you’re likely to see were designed by a company called Aero Safety Graphics, a specialist company who has been drawing and creating artwork for these things since the mid 1980s and exclusively on Macs since 1990. That may not seem much to Mac newcomers, but back then it was still a bit forward-thinking for an established company to commit 100% to computer-based artworking. There wasn’t really any credible digital artwork alternative to the Mac at the time, but we still love ’em for it.
The graphics used in airline safety cards are generally of a certain type of stylised line drawing. There are some curious variations on this theme, but overall the method is the same: create a simple vector outline of the body, limbs and head, add a few minimal strokes to indicate essentials such as hairline, eyes and jacket – this is corporate-friendly stuff, remember. Some simplify the figures to almost cartoon-like ends, while others go further, with recognisable facial expressions and clothing detail. And of course there’s the structural stuff; airline seats and seatbelts, the emergency doors, and the obligatory illustration of the plane in water (always unfeasibly calm) with the emergency slides in operation. The aim is clarity above all else.
Recognisable style, easy replication – the next step should be obvious: it is time to make your own. Start with a photo of someone – don’t try to begin from scratch with no source to work from. A basic action shot is probably best, but it does hinge on what you need to make the illustration convey. You’ll be simplifying this massively so don’t use anything that needs a lot of detail to be recognisable. On the other hand, you will almost certainly be stripping out the original background and adding your own elements, so it really doesn’t matter whether the original shot was taken in a pub, at the park or in your office.

1) Clean up the photos if necessary by painting out distracting elements in Photoshop, then save and import into Illustrator. Use the Pen tool to draw around the figure’s outline first, then draw some of the inner parts that give it an identifiable look. Feel free to simplify and adapt as necessary to get to the illustrative look you want.
2) Using strokes of different weights in parts of the artwork can help give the end result a more sophisticated – okay, at least nuanced – feel. Try setting the outline strokes to something relatively heavy, maybe 4 points or so. The ideal line weight depends on the scale of your photo, so experiment to see what seems best.
3) Set the weight of the lines defining the major shape of the face, clothes and other strong elements to something just a little lighter than the outline stroke weight. This should be enough to give it a little strength but not so much that it matches the outer strokes.
4) Finally, select any smaller details you’ve added and make sure their stroke weight is lighter than the previous weights. Be ready to remove and simplify at this stage; most people tend to add too much detail here, forgetting that the aim is to create a clear, simple and above all informative illustration.
 Once all this is finished, turn your attention to the figure’s environment and what you want to show. How about depicting something more dramatic, such as broken windows, smoke or flames? Do this on a separate layer to make selecting and moving your elements simpler.
Patches of colour are useful for giving parts of the illustration a more cohesive feel. Stick to flat hues rather than complex gradients, and keep your palette very limited. A rich buttercup yellow is normally reserved for inflatable items and red for warnings. If you have trouble drawing these, remember Illustrator’s Layers panel. Lock the layer that has your outlines, draw colour blocks on a new layer, then move that below the first in the Layers panel list.
This kind of illustration style is so easy to spot that it has a built-in use limit, but it can be very good for getting a distinctly instructional feel. Look back far enough in back issues of MacUser and you’ll see that we did exactly this sort of thing with a short series of visual how-to articles on iPod tricks and similar articles.

Hi, there,
I have a rather random question. We would like to use the image http://www.thisbloglife.com/wp-content/uploads/2012/07/card-4.jpg in a downloadable publication.
Do you know who owns the rights to it?
Christi Clemons Hoffman
Interesting question! It is from an in-flight safety card – Thomas Cook or Thompson Airways, I can’t remember which. Copyright remains with the originator and the publisher, it’s used here as editorial comment, a form of ‘fair use’ (legal doctrine in the US, at least). There’s a brief consideration of this in http://williamtennant.com/2014/02/19/what-use-is-a-fair-use/. Although that’s US-focused it’s a reasonable starting point wherever you are. Anyway, I’ve sent you my source images directly.